
For the past two weeks, I have been very busy moving all my Ghost apps images over to Cloudinary. As you probably know, my Photography Portfolio is running with Ghost and even there is not a ton of content, I needed to ensure it could meet these requirements:
- Deliver top quality images faster than my hosting solution
- Support RetinaJS assets upload via Ghost
If I was pretty confident with the 1st requirement, the 2nd was a tricky one in addition to move all existing content in Cloudinary.
A new Cloudinary storage adapter for Ghost
I looked for existing Ghost storage adapter and I found this one, maintained by Marco Mornati. Pretty good stuff he forked and fixed from another previous project.
I forked it myself so I could play with it why not improve it. Turned out, I rewrote the whole adapter using some ES6 (a first time for me) and re-released the adapter with up-to-date dependencies, excellent test coverage (100%) and CodeClimate Maintainabilty level A.
Just for fun and the pleasure to hack some JavaScript.
So, now I have a brand new and completely tested Cloudinary adapter for my Ghost portfolio. This allowed me to get very well acquainted with Cloudinary capabilities and its API documentation.
Here's my fork: https://github.com/eexit/ghost-storage-cloudinary
Retinize on-the-fly!
When my images were sitting side by side with my database in my current hosting solution, I needed to prepare ahead the retina variants of all my images. That was very cumbersome and gave me motivation to write a Go CLI app to save some time. The app kinda works but I never found the time to properly test it in production nor release it as an OpenSource project.
Besides, my Go skills grew since I started it so I would like to rewrite it with better asynchronous design and Golang idioms.
Anyway, I used to export my photographs in Hi-Res then generate manually the different retina variants using sips, Name Manger and ImageOptim.
photo export -> resizing -> renaming -> image optimization
Imagine doing this for all pictures and for all wanted Device Pixel Ratio (DPR).
Kill me…
In order to solve this time-consuming and computer dependency issue, I wrote a RetinaJS plugin to my Cloudinary adapter.
As input, it requires an image (any kind, size, etc.) and your Ghost theme image base width (the width of your image container in your posts/pages in fact).
The plugin computes, generates all the available retina variants and uploads them to Cloudinary (synchronously or asynchronously).
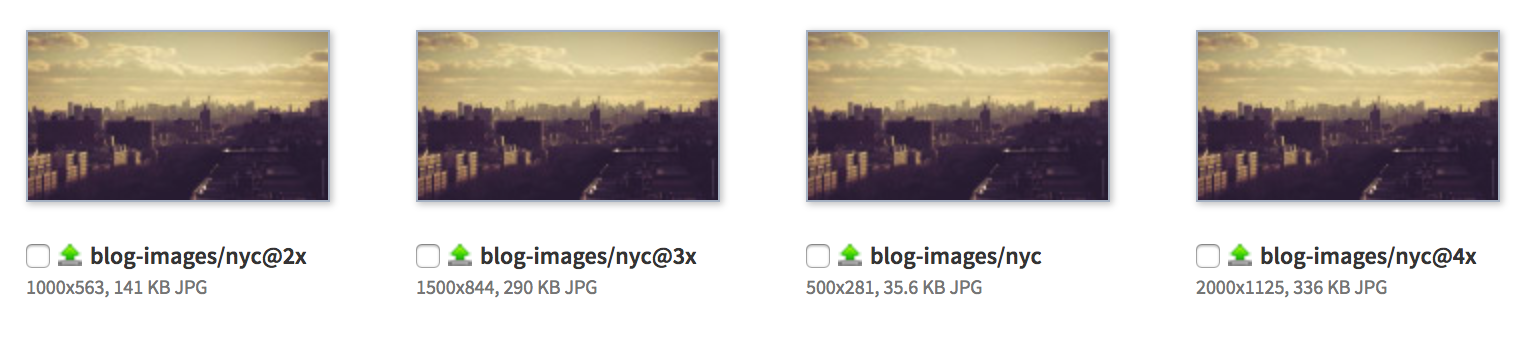
In the above example, I set the base image width to 500px and uploaded a 2000px width image: it generated and named the retina variants up to Retina 4k.
Cloudinary supports retinal content delivery up to Retina 5k so my plugin won't try to create variants bigger than 5 times the provided base image width.
This works perfectly with RetinaJS or any library which is able to dynamically load images that use Apple Hi-Res modifiers.
The final thought is that from now on, both my blog and portfolio are pushing images to Cloudinary and this is a really good news performance-wise:
- Cloudinary is an asset CDN (multi-location, replication, fast)
- Cloudinary's free plan provides a decent provisioned storage/bandwidth
- You can browse, organize, delete, tag images in the library
- Powerful and almost infinite image transformations capability
- Cost savings on my hosting solution's provisioned storage and bandwidth
It also allowed me to improve my UX on my portfolio: the homepage was laggy on smartphones due to the very heavy images loaded from my servers. Now, the result is smooth, images are loading faster and the quality is left untouched.
If you need an account, use my referral link.
Bonus: how to migrate former images?
Obviously, in the same process of using the Cloudinary storage adapter, I needed to move all my former content to Cloudinary. I couldn't allow having some of my content on my servers and the rest elsewhere.
I found this blog post from Marco which was very helpful but didn't work out: script was not compatible with Ghost 1.x, not maintained, etc.
I wrote my own script in NodeJS and did the job perfectly. I won't thoroughly explain how it works but it's straightforward enough to use it if you are a developer:
- Download your Ghost
contentfolder in a directory - Download the script in the same directory
- Open a terminal, go in that directory and run the command:
$ npm i --no-package-lock --loglevel=error cloudinary glob
- Update the script with your needs (tags, folder)
- Run the script:
$ CLOUDINARY_URL=cloudinary://xxxx node ghost-image-to-cloudinary.js
Before uploading, it will look for image name duplicates (throw an error if found) then upload everything to your Cloudinary library.
In the meantime, you can replace all your Ghost content image references by following these instructions.
Have fun and thanks for reading.